The majority of ASP .NET MVC sites I build I treat the site itself as a single UI. I don’t bother breaking it down into pieces, it is an MVC after all. Thus it already addresses separation of concerns. But what happens when your site gets large and you want to break it into application verticals within one MVC host. The first thing you do is break the site into Areas. This makes it possible to keep things organized. Now lets take it a step further, and you would like your area to be in a separate assembly. Maybe it is shared between applications, or you just want to track the development and control deployment a bit more.
I Googled all over trying to find a good solution. The most helpful post came from Patrick Boudreaux a couple years ago. Working your way through Patrick’s post you see that Javascript and Css still an issue:
To make a fully self-contained portable area, static content such as css, images and javascript needs to be embedded in the assembly, and found in a special way, just as the view templates are.
Thus we will include a way to solve that issue in my own ‘sepcial way’. Mileage may vary, so let me know in the comments.
You can find the example code on GitHub. This series will be known as The Poor Mans Modular Area for ASP .NET MVC or PMMA for short.
 We will try to make this as simple as possible. I feel like ‘Simple‘ is a forgotten art form in the .NET world. It would be great to just include a reference to another MVC application and use it’s areas. If you try that though, you will find issues with both projects trying to take the wheel to drive. We can avoid that by simply removing redundant pieces of the hosted Area. Also, I want to simply and clearly prove the way the application is running, so we will assemble a prof of concept project. We will perform a simple string assignment in the Area’s controller, print that string in a View and load a Javascript file and a CSS file that all live in the Included project.
The Project
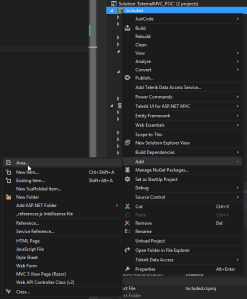
Starting the project created a new MVC 5 solution and called it ‘MasterUI’. Then add a second MVC 5 project called ‘Included’. Next add an area by right clicking the Include project and selected Add > Area and name it “TestArea”. Then within the area right clicked on the Controller folder and added a controller named ExampleController.cs. Then inside the Index action add the line:
ViewBag.Message = "SUCCESS!!!";
Now right click on the Index() method name and selected add View. My view Code looks like this:
@{
    ViewBag.Title = "Index";
}

@Styles.Render("~/Included/Content")

<h1>EXAMPLE AREA</h1>
<h2>@ViewBag.Message</h2>

@section scripts
{
    @Scripts.Render("~/Included/Scripts")
}
You will notice the Styles.Render() under the default ‘Title’ assignment that refer to a package with a URL that includes the Area name. I did this to keep convention and keep it clear where the script is coming from. It may make sense to be even more explicit, but this will be OK for this context. Then note it will place the message inside H2 tags to prove the controller is talking to the view. The Scripts.Render() call will place some scripts in the ‘scripts’ layout section of the master layout. It too refers to the Area name.
From the Included project delete Global.asax, Controllers, fonts, Models and Views. In the ‘MasterUI’ project add a reference to the ‘Included’ project. Run MasterUI and navigate to /TestArea/Example and prove you get a 404.
The Magic
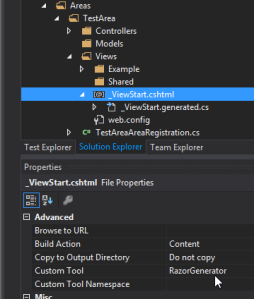
 The first thing you want to do is add a Visual Studio extension that allows you to precompile your MVC Razor views. Open Extensions and Updates and search for and install Razor Generator. Razor Generator has two pieces: a VS extension and a NuGet package. These enable you to compile your Razor Views into the library. Enabling this is a little manual, but the payoff is well worth the effort. Once you install the VS Extension, manage the NuGet packages on the Included project, search for and add RazorGenerator.Mvc. As long as we are thinking about our views, browse to TestArea\Views in Solution Explorer. Locate the _ViewStart.cshtml and view it’s properties. Here is where the manual part happens. You want to type “RazorGenerator” into the ‘Custom Tool’ field. This should cause a .cs file to be generated from your view. There is no need to edit the .cs file, simply make your changes in the .cshtml and it will be updated for you. Next do the same to Example\Index.cshtml.
Now it is time to setup our static content. ASP .NET MVC has great static content handling built-in. We will leverage this by using a custom bundle transform. You may not consider my method to be “correct” but it seems to work. I am open to suggestions, let me know in the comments. The class implements IBundleTransform as follows:
public class StringResourceTransform : IBundleTransform
{
    private List<String> _resourceFiles = new List<String>();
    private string _contentType;

    public StringResourceTransform(List<String> resourceFiles, String contentType = "text/javascript")
    {
        _resourceFiles = resourceFiles;
        _contentType = contentType;
    }

    public void Process(BundleContext context, BundleResponse response)
    {
        string result = String.Empty;

        foreach (var resource in _resourceFiles)
        {
            using (Stream stream = Assembly.GetExecutingAssembly()
                .GetManifestResourceStream(resource))
            {
                using (StreamReader reader = new StreamReader(stream))
                {
                    result += reader.ReadToEnd();
                }
            }
        }

        response.ContentType = _contentType;
        response.Content = result;
    }
}
This allows you to specify a Bundle by giving a list of Resource paths. When the request comes in, the resources are read into a string and passed back out to via the response. Given the above class, you would then specify your bundles in the Included project’s Bundle config similar to the this:
var scriptsBundle = new Bundle("~/Included/Scripts",
  new StringResourceTransform(new List<String>()
    {
      "Included.Scripts.test1.js"
    }));
scriptsBundle.Transforms.Add(new JsMinify());
bundles.Add(scriptsBundle);

var cssBundle = new Bundle("~/Included/Content",
  new StringResourceTransform(new List<String>()
    {
      "Included.Content.Test.css"
    }, "text/css"));
cssBundle.Transforms.Add(new CssMinify());
bundles.Add(cssBundle);
Above first specifies a JS file that is located in the Included project under the Scipts folder by the name of test1.js. You notice that the contentType defaults to “text/javascript” so it doesn’t need to specify this on these sorts of files. The second set of lines do the same for a css file located in the Content folder. The path is specified as the location within the project by setting the files to be an Embedded Resource.
First place a file in the Scripts directory by the name of test1.js. Place the following text into it:
alert('success!!');
Then in its properties set ‘Build Action‘ to “Embedded Resource”. Next, add a file by the name of Test.css to the Content directory and also set its Build Action to “Embedded Resource”. Add the following text to it.
h2
{
    color: red;
}
Now head back to the MasterUI. There are only a couple changes that need to be made to make it aware of Included. With all the work we did in the Bundle config, simply add the following to the end of the BundleConfig in MasterUI:
Included.BundleConfig.RegisterBundles(bundles);
This will ensure the bundles fire. Now you just need to make sure the routing can find the controllers. The following line could be placed several places, but I just put mine in the Global.asax:
ControllerBuilder.Current.DefaultNamespaces.Add("Included.Areas.TestArea.Controllers");

This bit of magic lets the routing know to look in our Included project area namespace and find controllers. This way you don’t have to make any crazy changes to routing or build a custom anything else. Now run the application and go to /TestArea/Example. If you see an alert that says ‘success!!” and a result like the screenshot you did it right.
Enhancements
As you may be thinking, you could certainly do this without having a sub-folder ‘Areas’. The reason I did this is to make it clear we are dealing with an area, and to keep the namespace a little more organized.
If you are running in debug mode optimizations are off so you have to enable them with
BundleTable.EnableOptimizations = true;
But the problem then is that you have all your minification turned on too. This is addressed by simply surrounding your minify transforms with #if(!DEBUG) compiler directives.
Conclusion
Using this method I plan on creating a multi-facet application that will be a one stop shop for custom tools where I work. I will keep you posted on how it works out for me, feel free to do the same or ask questions in the comments.

Hi, i can’t seem to get the index layout to pick up the new embedded style. Is there anyway I could get a copy of your sample solution?
This is exactly what I am looking for it would be appreciated if you can post a example 🙂
You can find the project here: https://github.com/drydenmaker/PMMA-MVC
Like Greg (who posted on 4.21.14), I can’t get the index layout to pickup the embedded (red) style.
Have you had any luck with the bundle transform for css that includes images?
I have. I hope to post soon 🙂
dear drydenmaker,
thanks a lot for your sample concerning areas within a larger (business) MVC solution. I appreciate your concise way of implementation. From a runtime standpoint it works great when BundleTable.EnableOptimizations = true; But when BundleTable.EnableOptimizations = false; the css resp. .js file is not “registered” (there are no links) in the HTML that is sent back to the browser and therefore the alert() is not hit.
How can I achieve to spit out the css / js links to html in debug mode, say BundleTable.EnableOptimizations is set to false to meet any breakpoint ?
Thanks for some advice !
Alex
After clicking on the example link did you ever click back on home or any other links?
It does not work. So what good does this do?
I know it’s a couple of years after the fact now, but I’ve yet to find a better solution for creating “portable areas”. Thanks a lot for this very clear example and the main pointer to Razor Generator!
@Just a friend, this is easily resolvable by specifying an (empty) area name for the other links as well!